
Building A Mail Server – Postfix, Dovecot, & Squirrelmail
Version 1.0
Author: Eric Kahklen <eric [at] Kahklen [dot] com>
Last edited 05/11/2005
Base Installation –
Begin by installing Debian Sarge from the Net-Install CD. Choose the default options or which ever is more appropriate for your organization. If you have any questions on installing a base Debian system, check out The Perfect Setup – Debian Sarge 3.1 at:
http://www.howtoforge.com/perfect_setup_debian_sarge
Rather than chose to install the “Mail server” system, I choose to do a “manual package selection” and eventually quit the aptitude interface since I will be installing all packages via apt-get at a later point.
System Configuration –
Some of the first packages I install are SSH, Vim, and less as well as setup a static IP.
apt-get install ssh vim less
Network Configuration
/etc/network/interfaces
/etc/resolve.conf

/etc/hosts

Restart the network services:
/etc/init.d/networking restart
Remove Unnecessary Software
update-inetd --remove daytime
update-inetd --remove time
update-inetd --remove discard
[Y]
/etc/init.d/inetd reload
Install and Configure Postfix
apt-get install postfix
[Y]
[OK]
[Internet Site]
[NONE]
[hostname]
[OK]
[No]
Create a user and group called “virtual”. You’ll need to make note of their uid and gid which can be found in the /etc/passwd and /etc/group files respectively. Then create a directory where mail will be stored with the correct permissions.
useradd virtual
groupadd virtual
mkdir /var/spool/vmail
Next, you’ll need to edit Postfix’s main.cf (/etc/postfix/main.cf).
First, add the following line:
virtual_mailbox_domains = /etc/postfix/vhosts.txt
The vhost.txt file is a single colum file that lists all the domains your hosting.
domain1.com
domain2.com
Second, add the following line:
virtual_mailbox_base = /var/spool/vmail
This points to the directory where all the mail will be stored.
Third, add the following line:
virtual_mailbox_maps = hash:/etc/postfix/vmaps.txt
This is a two column file. The first column identifies the virtual email address and the second column points to their mailbox location. When you add a “/” to the end of that location, it uses the Maildir format vs. mbox. The second column specifies an appended location vs. an absolute path. Also, if you use the Maildir format, you’ll have to create 3 subdirectories (new, cur, tmp). You’ll have to create the directories under /var/spool/vmail.
#vmaps.txt
[email protected] domain1.com/joe/
[email protected] domain2.com/joe/
Make sure to run postmap your vmaps.txt file when its created or when ever you make changes.
postmap vmaps.txt
Create the necessary directories. Upon testing, the new cur tmp directories appear to be created automatically when mail is sent to the mailbox.
mkdir “hostingdomain” mkdir domain1.com
cd “hostingdomain” cd domain1.com
mkdir “usermailbox” mkdir joe
mkdir new cur tmp this may not be needed
chmod 700 new cur tmp
Run this last command at the end or when ever you add new directories so your newly created directories have the correct permissions.
chown –R virtual:virtual /var/spool/vmail
Fourth, add the following line:
virtual_uid_maps = static:1001 (verify for “virtual” user)
Defines the account (“virtual”) that have permission to access the mailboxes.
Fifth, add the following line:
virtual_gid_maps = static:1001 (verify for “virtual” user)
Defines the account (“virtual”) that have permission to access the mailboxes.
Sixth, add the following line:
virtual_alias_maps = hash:/etc/postfix/valias.txt
This last file has two columns and allows you to utilize aliases. Make sure to run postmap on the valias.txt file.
[email protected][email protected]

Reload postfix:
postfix reload
Test Postfix
From the command line connect to the mail server and run the following commands.
telnet 10.0.0.15 25
helo mailserver.net
mail from:[email protected]
rcpt to:[email protected]
data
.
quit
You can verify email was received and delivered to /var/spool/vmail/domain1.com/joe. Within this directory you’ll see 3 directories (cur, new, tmp). If you encounter problems view the logs at /var/log/mail.*
Configuring the MDA
In this configuration we’ll use non-unix accounts. Rather than use overly complicated back-ends like LDAP or MYSQL, we’ll use simple text files. In order to accomplish this, we’ll need to install Dovecot.
apt-get install dovecot-common dovecot-imapd dovecot-pop3d
Next, we’ll need to edit the dovecot.conf file (/etc/dovecot/dovecot.con). Your file should have these configurations, but I will comment (#) out some of the SSL lines so we can test the basic setup until we can get Open SSL working properly.
01 base_dir = /var/run/dovecot/
02 protocols = imap pop3 imaps pop3s
03 ssl_disable = no
04 ssl_cert_file = /etc/ssl/server.crt
05 ssl_key_file = /etc/ssl/server.key
06 ssl_parameters_file = /var/run/dovecot/ssl-parameters.dat
07 ssl_parameters_regenerate = 24
08 log_path = /var/log/dovecot
09 info_log_path = /var/log/dovecot.info
10 login_dir = /var/run/dovecot/login
11 login_chroot = yes
12 login = imap
13 login_executable = /usr/lib/dovecot/imap-login
14 login_user = dovecot
15 login = pop3
16 login_executable = /usr/lib/dovecot/pop3-login
17 verbose_ssl = yes
18 valid_chroot_dirs = /var/spool/vmail
19 default_mail_env = maildir:/var/spool/vmail/%d/%n
20 imap_executable = /usr/lib/dovecot/imap
21 pop3_executable = /usr/lib/dovecot/pop3
22 auth = default
23 auth_mechanisms = plain digest-md5
24 auth_userdb = passwd-file /etc/dovecot/users
25 auth_passdb = passwd-file /etc/dovecot/passwd
26 auth_executable = /usr/lib/dovecot/dovecot-auth
27 auth_user = root
28 auth_verbose = yes
The comments in the conf file should provide you with enough of and explanation to troubleshoot, but I’ll go over a few things that are a bit cryptic.
In the comments, you’ll see the following variables as they relate to line 19:
%n - user part in user@domain, same as %u if there's no domain
%d - domain part in user@domain, empty if user there's no domain
So for line 19, the %d pulls the domain portion from the username ([email protected]) and the %n uses the user portion. This simply replaces the need information on the fly so that the mailbox is found correctly.
Line 23 specifies that we’ll use plain and digest-md5 authentication methods.
Line 24 and 25 are like second /etc/passwd and /etc/shadow files. The format is below:
userdb
USER UID GID MAIL DIR SHELL
[email protected]::1001:1001::/var/spool/vmail/domain1.com/:/bin/false::
passdb
USER PASSWORD
[email protected]:$1$G/FqlOG5$Vj0xmc9fKY.UVr8OWr/7C1
To create the hash (PASSWORD), use the mkpasswd utility to generate MD5 passwords. To install the utility, you can do the following to find what package its located in:

Now create the files specified in the configuration.
users

Create the password hash for the password “test”.

passwd

When you are done, test to make sure Dovecot is configured properly.
$ telnet domain1.com 110
Trying 192.168.1.2
Connected to domain1.com
Escape character is '^]'.
+OK dovecot ready.
user [email protected]
+OK
pass test
+OK Logged in.
Setting Up Webmail
To provide secure access to email, we will be using a web based email client on top of Apache with SSL. First we’ll need to install Apache which will include OpenSSL and the SSL modules for Apache.
apt-get install apache2
To utilize SSL, we’ll need to create our own self signed certificates unless you purchase one from a 3 rd party. If you need more information on this topic, please go to this site:
http://www.eclectica.ca/howto/ssl-cert-howto.php/
Otherwise follow these steps.
cd /etc/apache2/ssl
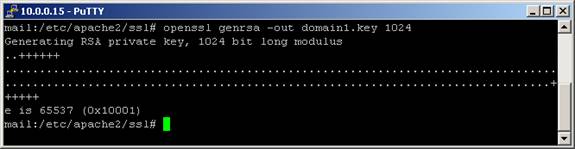
Generate a private key that does not require a pass-phrase
so that Apache can start without one being entered.
openssl genrsa –out domain1.key 1024
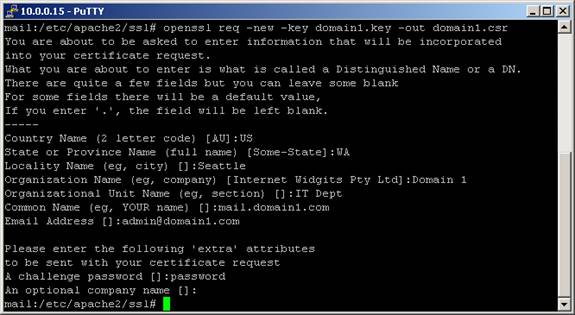
Create a Certificate Sign Request for your site.
openssl req –new –key domain1.key –out
domain1.csr
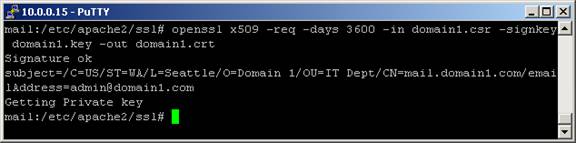
Create a self-signed certificate that will be used for
temporary use in testing.
Openssl x509 –req –days 3600 –in domainname.csr \ -
signkey domainname.key –out domainname.crt
Now that we have the required certificate and key we can start configuring Apache to server up Squirrelmail protected by SSL! We’ll first need to enable the SSL modules. Complete the following commands:
Edit /etc/apache2/ports.conf and add Listen 443:
Listen 80
Listen 443
Now we have to enable some Apache modules (SSL, rewrite and suexec):
cd /etc/apache2/mods-enabled
ln -s /etc/apache2/mods-available/ssl.conf ssl.conf
ln -s /etc/apache2/mods-available/ssl.load ssl.load
Restart Apache:
/etc/init.d/apache2 restart
Make note of any errors and fix them prior to continuing.
Next, we’ll need to install Squirrelmail.
apt-get install squirrelmail
Once its installed, we’ll need to configure Apache to host the application. Using Vi or your favorite editor, create a file under /etc/apache2/sites-available/ and enter the following:
<VirtualHost domain1.com:443>
ServerName soundgeek.net
DocumentRoot /usr/share/squirrelmail
SSLEngine On
SSLCertificateFile \
/etc/apache2/ssl/domain1.crt
SSLCertificateKeyFile \
/etc/apache2/ssl/domain1.key
</VirtualHost>
After your done editing this file, you’ll need to enable the site. Run the following command. Replace “webmail” with the name of your file.
a2ensite webmail

Restart Apache:
/etc/init.d/apache2 restart
Test this by pointing your browser to your server:
You may need to edit your hosts file so that the certificate works properly.
Note –